This article will provide you with best practices around changing your website URL to make it easier for your team to monitor changes and ensure it is indexed by Google search.
Assuming the platform doesn’t change, then the transition to a new domain name will not require you to update tracking codes from Google properties or social media sites such as Facebook or LinkedIn.
We also recommend you read the following detailed resources from Google if you are concerned with your site being negatively affected from an SEO perspective. This is strongly recommended If you are transitioning to a new platform and/or updating your URL structure. A great CMS can boost your website's SEO.
Below are some of the key actions you should perform.
Your Elcom platform
You will need to implement a 301 redirect from your existing domain to your new domain. A 301 redirect is a permanent redirect that passes full link equity to the redirected page. This means that pages will not loose their ranking in the search engine results.
Your Project Manager and the Elcom team will be on hand to assist you.
Google Search Console
Google Search Console helps your monitor and optimise your site search performance. We strongly encourage you to use this tool as it will help you fix issues after moving your domain that may negatively affect your SEO rankings.
Claim your website and check settings
A successful site move depends on correct—and up to date—Search Console settings.
If you haven't already, verify that you own both the old and new sites in Search Console. There are multiple ways to verify your site. We recommend doing so via using the same Google account that has edit access in Google Analytics or Google Tag Manager.
You can read the instructions here.
Be sure to verify all variants of both the old and new sites. For example, you should verify www.example.com and example.com, and include both the HTTPS and HTTP site variants if you use HTTPS URLs. Do this for both old and new sites.
Use the Change of Address tool
This tool tells Google about your change and helps to migrate your Google Search results from your old site to your new site.
Simply open the Change of Address tool in a property that is at the domain level (that is, it has no path segments--example.com, not example.com/petstore).
Follow the instructions provided in the tool.
You can find more information here.
Submit a new sitemap
A new XML sitemap will need to be uploaded to reference the new domain and its page to the Sitemaps section in Google Search Console.
Note: Google will eventually index your new URL regardless of whether you submit a new sitemap. However, we strongly recommend you do do as it a) prompts Google to crawl, index and rank your new URL faster and b) you can specify which URLs you actually want crawled.
To generate a sitemap using the Elcom platform, click on your platform version from this list and follow the instructions.
Test 301 redirects
You can use the URL Inspection Tool for testing individual URLs, or command line tools or scripts to test large numbers or URLs.
Monitor traffic
Once you've started the site move, monitor how the user and crawler traffic changes on the new site and also the old site. Ideally the traffic on the old site will go down, while on the new site the traffic goes up. You can monitor user and crawler activity on the sites with Search Console and other tools.
Many features of Search Console help you monitor a site move, including:
- Sitemaps report: Regularly check in to see how many of your new URLs has been indexed.
- Index Coverage report: The graphs would reflect the site move, showing a drop in indexed URL counts on the old site and an increase of indexing on the new site. Check regularly for any unexpected crawl errors.
- Search queries: As more pages of the new site get indexed and start ranking, the search queries reports would start showing the URLs on the new site getting search impressions and clicks.
Google Analytics
If you are using the same Google Analytics property, then you will not have to update your tracking code. A property is a website, mobile application, or device (e.g., a kiosk or point-of-sale device.) where you would want your data to be separate. An account can contain one or more properties. You can find more information about organisation, account, property and views here.
Update Property Settings
- Go to your Google Analytics dashboard
- On the bottom left hand corner, click on ‘Admin’
- Under the relevant property, click on Property Settings
- Update ‘Property Name’ and ‘Default URL’ fields
Add in an annotation
Annotations are short notes that you can add to dates within your Google Analytics reports. You use these to mark important dates such as new campaigns, website changes, causes for spikes or dips in traffic and so on.
It is very helpful to create an annotation for your domain name change, so you can see if traffic has been affected after you change domains. Do this after you have changed domains.
- Click to view any report e.g. ‘Acquisition > Channels’ or ‘Behaviour > Site Content > All Pages’.
- Click the small tab below the timeline.
- Click ‘+ Create new annotation’ on the right hand side.
- Select the date for the annotation.
- Enter your note.
- Select the visibility of the annotation (if you have ‘Read & Analyze’ access you will only be able to create private annotations).
- Click ‘Save’.
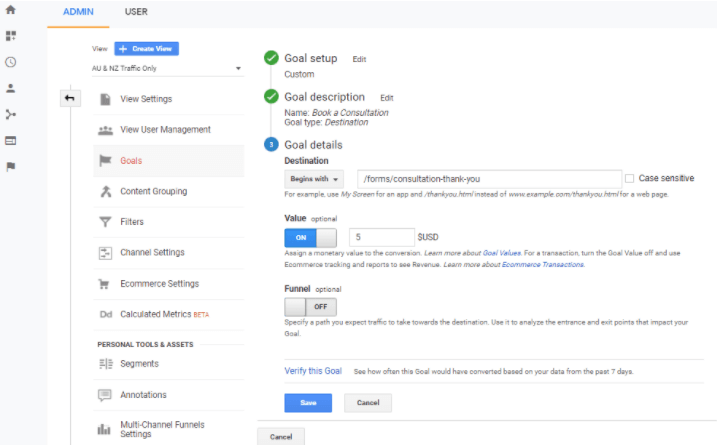
Goals
If you have goals setup that are based on a URL, you may need to update the goal URL to ensure it is still referencing the correct URL.
External Websites and Backlinks
Immediately after the site move is started, try to update as many incoming links as possible to improve the user experience and reduce your server load. These include:
- External links: Try to contact the sites in the saved list of sites linking to your current content, asking them to update their links to your new site. Consider prioritising your efforts by the number of inbound visits for each link.
- Profile links such as from Facebook, Twitter, and LinkedIn.
- Ad campaigns to point to the new landing pages.